What is row level security?
Power BI row level security (RLS) is an user authorization and security method for a Power BI dataset. It will make sure that users with viewer permission in the Power BI service workspace will have limited or specified access to the data in the published Power BI dataset.
What does it do?
For every row in a specified Power BI table it checks if the predefined selection matches and if it does not it is considered not allowed and therefore filtered out (not visible). You can say it works the same as a slicer or filter on a Power BI report.
The main difference is that RLS is not visible on a page but implemented in a separate tab “Modeling – Security – Manage Roles” .
To set up a good RLS in a Power BI dataset you will need at least the following requirements:
- A table with data (fact or dimension) which you can put a selection (filter) on which applies to a specific user of business unit.
- Access to Power BI service – a pro license workspace – and a published data model.
Example 1:
Let’s have a look at an example.
Imagine you have 2 business units in your data. They are not allowed to see each other’s data.
You data could look something like this:
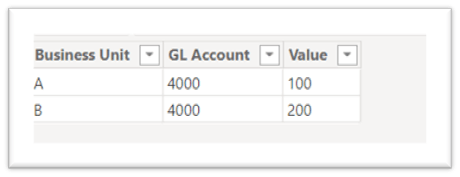
In the image you can see the field business unit which specifies A and B. We can use this as filter context in our RLS.
If we do well on implementing our RLS the business unit A will only see the value of 100 and the business unit B will only see the value of 200.
I will now discuss three ways in order of simplicity.
Static
If you are a Power BI developer who is just starting with Power BI you will likely start with a static RLS. This way is very useful for developers and companies who are very new to Power BI and therefore still have to do a lot of manual work.
Let’s continue with our example above.
We would like to make sure that business unit A only sees the value of 100 and business unit B only sees the value of 200. We can do this , in Power BI desktop, by going to Modeling – Security – Manage Roles. Here we can create a (RLS) role and put a filter on the specific business unit.
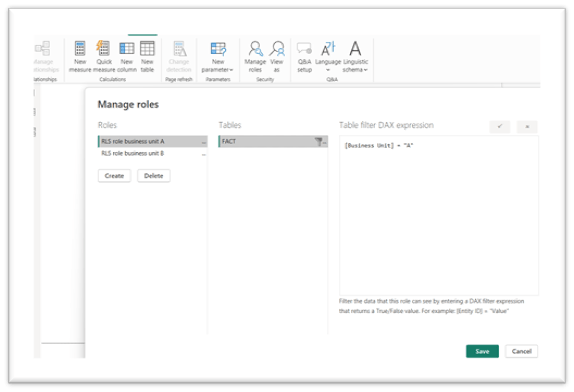
Power BI desktop will now see this role as a predefined filter.
Be aware! In Power BI desktop this filter does nothing. The developer still need to see all the data. This filter will start having effect once this dataset is published into the Power BI service.
In Power BI service we can go to our recently published dataset and with the three dots on the side we can go to security. Here we find our created roles again where we now can assign users to a specific role by e-mail address (USERPRINCIPALNAME() ) .
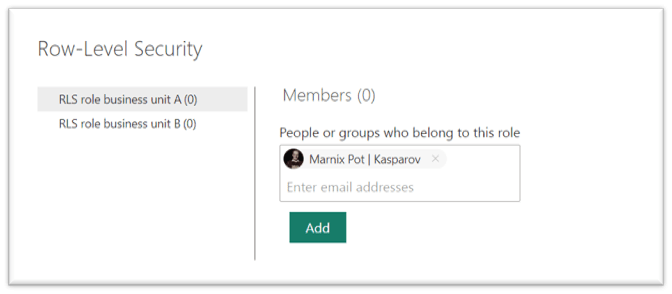
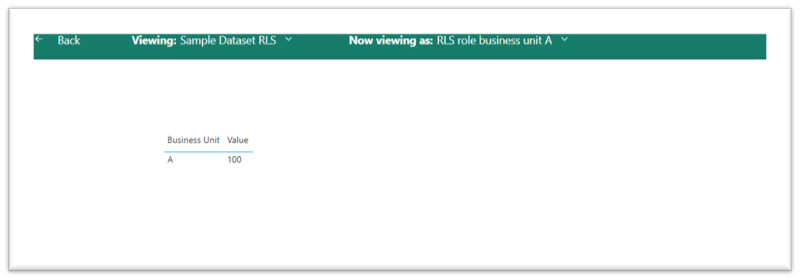
Our assigned user will now only see data assigned to role A.
Be aware! The user has to have viewer permission in the workspace. For every other permission the RLS will not work.
Dynamic
Based on (RLS) Static we have now implemented a way of RLS in our Power BI dataset. It works but a big disadvantage is that a lot of manual work is involved.
For example: Every time a new business unit is added a new role need to be created and new users need to be added to the role.
If there are not many users this is still manageable, but once the dataset and Power BI environment grows and the users are expanding we would like a more dynamic way of RLS.
For a dynamic RLS we can use the DAX query USERPRINCIPALNAME(). This DAX query returns the e-mail address ( USERPRINCIPALNAME() ) of the current logged-in user. And we can of course use this automatic output as a filter context.
Let’s continue on our example and upgrade our case:
Let’s say that we do not have 2 business units, but 5 business units. We do not want to create 5 roles and maintain al these roles separate. It would be so much better if we could create one role for al 5 business units. We can do this by creating a dynamic RLS with DAX query USERPRINCIPALNAME().
Let’s state that we have an administration (in excel or somewhere else) that states which user belongs to which business unit. This would look something like this:

We can of course load this administration into our Power BI model and create a relationship between our original data and our new data on business unit.

In this case Business Unit [Employee] would filter Business Unit [Business Unit] and therefore filter FACT [ Business Unit]. And Business Unit [Employee] equals to the output of our DAX query USERPRINCIPALNAME().
Let’s update our RLS in Modeling – Security – Manage Roles.
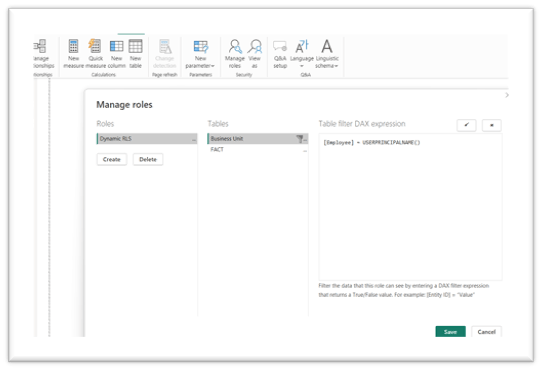
You can see that we now have created one dynamic RLS role. Instead of filtering on FACT [Business Unit] we now filter on the Business unit [Employee] by USERPRINCIPALNAME().
We made sure we now only have to maintain one RLS role in Power BI service.
Tip! Work with Azure AD security groups. By creating a Azure AD security group and adding the users into this group you will reduce the number of users you need to add the role. If you add the security group to the role, Power BI service will still see every user by USERPRINCIPALNAME(). You therefore don’t have to add every user separate to the role.
Dynamic RLS is more efficient and less time consuming, but unless we have the USERPRINCIPALNAME() in our data, we do have to manually maintain a RLS administration where we define the filter context and USERPRINCIPALNAME().
Advanced
Let’s take it one step further and assume that we have so many users that it is impossible to keep an excel administration. There is a solution but it does require certain authorization rights and can be definitely considered an advanced way of implementing RLS.
Our main starting point will be where we left with our dynamic RLS, but we do not have the capacity anymore to maintain a RLS administration in excel. We are looking for a way to also make this as dynamic as possible.
What we need is a way to automatically import our USERPRINCIPALNAME() in combination with the business units and security groups. I have created a way for doing so into a dataflow. See below for JSON download.
Before we will go into the steps we need to prepare some data and authorizations.
Requirements
1. Make sure we are working with Azure AD security groups. Every user is assigned to a security group and this security group has the business unit (or filter context) in the name.
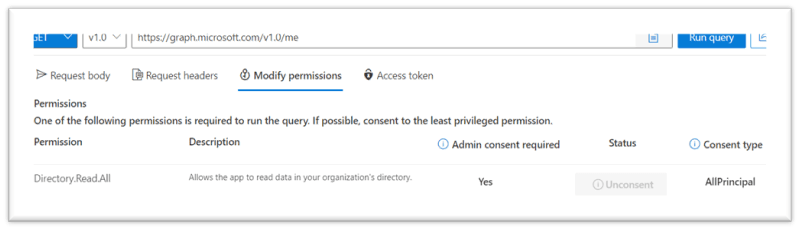
2. Make sure the admin of your account has given you permission to use the Microsoft Graph API (directory.read.all) – delegated permission. If the admin has not giving the consent type AllPrincipal The user must be a member of the Security Reader Limited Admin role in Azure AD (either Security Reader or Security Administrator).
AllPrincipals indicates authorization to impersonate all users. Principal indicates authorization to impersonate a specific user. Consent on behalf of all users can be granted by an administrator. Non-admin users may be authorized to consent on behalf of themselves in some cases, for some delegated permissions.
3. Write down the group ID of the workspace your dataset is published in. You can find this in the URL.
4. Generate a Power BI REST API bearer token by going to https://learn.microsoft.com/en-us/rest/API/power-bi/reports/get-reports#code-try-0 and copy the bearer token it gives you.
5. Generate a Microsoft Graph API bearer token by going to https://developer.microsoft.com/en-us/graph/graph-explorer and run the GET API https://graph.microsoft.com/v1.0/groups. In the 4th tab “ access token” you will be able to copy the access token that was needed to create your output.
6. Add both tokens into the parameters in the dataflow, go through the authorization process ( anonymous access) and check the output.
7. If you have security groups within security groups, expand the next groups with their id’s and run the API function ( API_CALL(“v1.0/groups/” & [identifier] &”/members?$count=true&$top=999″) ) on the expanded id column. Repeat this process until you reach the end of available groups. This will usually be once you are allowed to expand a column called something like user principal.
*Every API_CALL will go till 999 records, otherwise you will need a pagination query which is not included in this blog or dataflow.
You can use the output of the table workspace access in the dataflow in the same way you use your previous RLS excel administration by dynamic RLS. Only now you have imported it in a much easier and efficient way.
Be aware! I specifically choose to do this by dataflow. I choose a dataflow because a dataflow stores your data and does not require a refresh every time your Power BI dataset refreshes. Because of the manual generating of the bearer tokens it is not sufficient to add this query into a model with automatic refresh. I therefore choose a dataflow. If you have an admin account and therefore can generate bearer tokens automatically you can use this query in a model with automatic refresh.
Next steps when a user need to be added to the RLS:
- Make sure that person is added to a security group.
- Make sure that security group is added to a RLS role (if not already there)
- Refresh the tokens in the dataflow by step 4 and 5 ( can be automatic if you have the right access).
- Refresh the dataflow.
- Refresh your Power BI Model.

